OSLO-STEPS Linked Sources Overview
Introduction
We describe the different data sources and data formats which are taken into account when composing workflows. We furthermore explain, how these formats relate to each other and how we translate between different relevant formats.
Data Sources
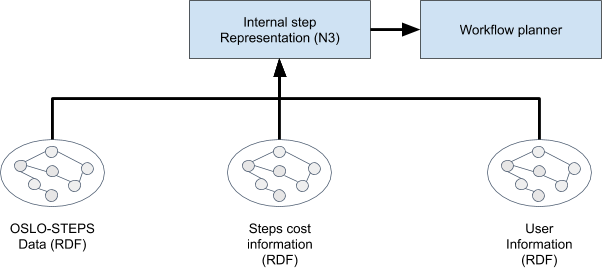
The planning process makes use of (i) public service steps descriptions in OSLO-STEPS, (ii) step related cost information, and (iii) information and about the user. In the following we will describe each of the three components and then introduce the internal step representation in N3 utilized by the workflow planner.
OSLO-STEPS description
The following concepts of the data model are relevant for the planning process: Steps, states and state shapes. In the following these concepts are briefly described, a full documentation is available here. Additionally listing 1 shows an example to illustrate how steps are represented in OSLO-STEPS.
Steps
A step is an action which can be performed in a workflow. Each step can only be executed if certain conditions are fulfilled (pre condition) and each step leads to a new situation (post condition). We describe these conditions and the resulting situation on terms of so-called states. In the example in Listing 1, we see the description of the step confirmAddressChange. This description refers to the visit of a policeman which is required in Belgium if a citizen wants to change his address. The step can only be executed, if the address change is declared and after the visit of the policeman, the change is confirmed.
Steps can be described at different levels of granularity. We can for example understand the act of providing personal information like name, date of birth and national number as one big step or we can see giving each of these details as small single steps. It depends on the particular use case, how fine-grained the steps need to be and in our project, we need different levels of granularity. We therefore decided to introduce different hierarchy levels: component level, container level and journey level. Workflows can be composed on each of these levels. The step displayed in Listing 1 is a component level step, that is the lowest level in our representation and the step can not be split up in smaller steps any more.
                        step:confirmAddressChange a o-steps:ComponentLevelStep ;
                            rdfs:label "Confirmation of address change"@en ;
                            o-steps:producesState state:addressChangeConfirmed ;
                            o-steps:requiresState state:addressChangeDeclared .
States
Pre and post conditions of steps are described as states. States are representations of situations. In the context of steps, these situations can either be requirements to execute a step or they can be the result of such an execution. In our format each state has a URI and thus can have meta information. A state furthermore has one or more state shapes assigned which further describe it. Additionally it can have UI shapes which are used to specify the data format an answer is expected to be provided in.
In Listing 2 we provide the example of a state declaration. The state state:addressChangeDeclared is a state in the OSLO vocabulary and it has the shape shape:addressChangeDeclaredShape associated to it as a state shape.
                        state:addressChangeDeclared a o-steps:State ;
                            rdfs:label "Declared address change"@en ;
                            o-steps:hasStateShape shape:addressChangeDeclaredShape .
State and UI shapes
Shapes specify how the triples representing a state should look like. Here, we use the SHape Constraints Language (SHACL). With SHACL we can describe the syntactic shape of a triple or a set of triples. This for includes specifying the predicates which for a certain node need to have values, but also the specific kind of values (string following a certain pattern, integer within a range, etc.).
It depends on the intended use of the shape which kind of information it should contain. While for our workflow composition process it is very important whether or not certain kinds of triples are valid at a certain point in time, for the user interface it is much more important how the data needs to be represented, it should for example be excluded that users can enter negative ages or order a negative amount of tickets. For the needs of the project, we defined two different kinds of shapes: UI shapes contain the information which is relevant for the UI, state shapes contain the information our internal representation format needs.
In Listing 3 we display an example state shape. In order to obtain the state the shape is associated to, for each instance of the class o-persoon:Inwoner there needs to be a triple with the predicate ex:addressChangeDeclared and the object true. This state shape is special in the sense that the information it provides are also interesting from a UI point of view and could therefore also be used as a UI shape. We do not only state that a certain triple needs to exist (sh:minCount 1), we even specifically state its value and that value is a constant. In practice, most state shapes are declaring the existence of certain triples since our composition relies on the dependencies of data based on triple level.
                        shape:addressChangeDeclaredShape a o-steps:StateShape ;
                            sh:targetClass o-persoon:Inwoner ;
                            sh:property shape:addressChangeValue .

                        shape:addressChangeValue a sh:PropertyShape ;
                            sh:path ex:addressChangeDeclared;
                            sh:hasValue true ;
                            sh:minCount 1.
Step-related cost information
Next to the required and produced state of a step, we also need to express its weights. Weights are quantitative values expressing some kind of cost of the step. Costs can for example be the time which is spend executing a step or the actual money (if any) you need to pay in order to execute the step.
In general, the costs of a step are use case dependent and our implementation can handle steps as long as the mechanism how the costs need to be combined is clearly defined - we for example calculate the overall cost of a workflow as the sum of the costs of its different steps. To declare costs we defined the predicate cost:cost which can have several subpredicates. In our current implementation we work with the costs cost:usersatifaction - here we give a value between 0 and 1 where 0 is very unhappy and 1 is satisfied, the values can be multiplied to get the overall value for a workflow - cost:duration - here we measure the time a step takes, the value is added - cost:success - here we capture the likelihood that a step leads to the desired result - and cost:monetaryCost - here we measure actual costs in Euro which are up to now not that relevant in our current implementation.
We display an example use of the cost vocabulary in Listing 4. The step of confirming an address change by the police normally takes 2 weeks (10160 minutes), the visit is free (0 monetary costs), 97% of the users are satisfied by that step and in 98% of the cases the step is executed as accepted (i.e. there is a policeman visiting the place).
                        step:confirmAddressChange cost:usersatifaction 0.97;
                                                                     cost:monetaryCost 0;
                                                                     cost:success 0.98;
                                                                     cost:duration 20160.
User information
Another important component for the planning process is the information about users which is considered for workflow personalization, i.e. optimal steps and step sequence per user. In the context of the FAST project, such information is assumed to reside in a trusted location, e.g. in the MijnBurgerprofiel database maintained by the government in Flanders.
Additionally, user information can be used to determine the state in which users are, i.e. which information is already provided and hence which steps are unnecessary to execute. Listing 5 shows information of a user. Where possible, we use existing vocabularies like foaf or schema.org . In the example, we already have the name, the national number and the cell phone number of the user and can therefore omit the steps which are in place to acquire that information.
Taking up the example provided above, the step step:confirmAddressChange is never necessary if the profile of the user already contains the information that the address change has been confirmed by the police.
                        :bob a o-persoon:Inwoner;
                                foaf:familyName "Doe";
                                foaf:givenName "Bob";
                                ex:nationalNumber 123456;
                                schema:contactPoint [ schema:contactType "gsm";
                                                                     schema:telephone 8888888 ].
Internal steps representation
In order to compose workflows, we rely on an internal representation format. This representation format makes use of Notation3 Logic (N3) an extension of the RDF turtle format which was used for OSLO-STEPS. N3 allows the user to cite graphs, to write logical rules and to use several built-in functions to for example calculate numbers or directly operate on strings. N3 is also the language the workflow composer itself is written in which also makes the format a natural choice to represent possible steps in workflows. However, we opted to introduce an alternative data format (OSLO-STEPS) to represent possible steps of a workflow in this project. This has two reasons, firstly, we wanted to have a format which is as close as possible to the other formats designed in the OSLO framework such that users used to these other formalisations can easily adapt, secondly, we did not want to use a non-standard syntax (N3 logic is no W3C recommendation but only a possible candidate) since - based on our experience - that can stop potential users from actually using the specification. As we will explain later, OSLO-steps can automatically be translated to our internal format such that every potential user can freely choose which format he or she wants to use in order to describe possible steps of workflows. In this section, we introduce our internal representation format, in the next section, we further elaborate how the translation between the formats is done.
The step description in our internal format is done using a backward-rule. In N3 we can state rules which act on linked data. These rules can either be stated as a forward rule (using the arrow "=>") or they can be stated as a backward rule (using "<="). From a model theoretic perspective, both kinds of rules have the same meaning, namely a logical implication, but from a procedural point of view, they differ: The EYE reasoner which we used in our implementation applies forward reasoning when a rule is stated in a forward manner and backward reasoning when we have a backward rule.
In practice that means, that forward rules get applied on the initial knowledge till a goal is reached while backward-rules start from the goal and try to verify it based on rules and facts. In the context of our workflow engine which deals with data change, it must additionally be mentioned, that when applying forward reasoning, interim results get stored internally.
{
Map gps:description (
From-part
Transition-part
To-part
Step name
Weights
)
}
<={Where-part}.
This is also the reason why our workflow composer only makes use of backward rules. The composer tries to find paths to a predefined goal. During that process, data can change and with these changes, the consequences of data can also get invalid. A step description in our internal format consists of different parts which are also displayed in Listing 6. Below, we discuss the meaning of these different parts:
Map: Name of the map the step belongs to. We divide our step descriptions into different sets called “maps”. This distribution into maps is needed because rules can come from different sources and use the same vocabulary differently (even if standardization efforts as OSLO try to prevent that). Naming the corresponding map together with a step description helps us to control unintended interaction between steps from different maps.
Step name: For each step we describe which data gets invalid by the execution of the step. This data is expressed by means of triples and surrounded by curly brackets {}. It can contain variables (starting with question marks ?), but all variables it contains also need to be present in the Where-part of the description. This has technical reasons, but since all data which can be removed also needs to be valid, this does not impose any limitations in expressiveness.
Between-part: As our steps have durations, it can be important to know what happens with our data after the execution of a step has started and before its execution is finished. This is expressed in the Between-part of the description. This between-part contains triples and from the syntactic point of view it has the exact same restrictions as the From-part. If we want to use new variables in that part of the description, these need to be declared in the Where-part of the description.
To-part: For each step we describe the situation the execution of the step causes. The same syntactic requirements we imposed on the Between-part of the step description also apply here.
Where-part: For each step we describe the condition under which the step can be executed. This part of the description can also be used to do calculations (if the step changes or manipulates a value, it can be that the new value depends on the old one, here we need to calculate). For technical reasons (backward rules cannot contain new variables in their consequence) this part also needs to be used to declare variables which are only used in the To- or in the Between-part of the description. For these a Skolem variable needs to be created, that is a unique URI which represents a resource. As we will discuss below, the reasoner we use can do that automatically.
Weights: The weights of a step in our internal description format are the analogue to the the costs as represented in OSLO-STEPS. Each step can have different kinds of weights like for example the monetary costs of its execution or their expected success rate. Weights assigned to a step using ourinternal format need to be aggregatable, i.e. there needs to be a method with which an overall value for a composed workflow can be computed making use of the singleton values of the different steps.
Below, in Listing 7 we provide the description of the step step:confirmAddressChange which we also described above using the OSLO-STEPS vocabulary. The From-part and the Between- part are empty. The required state is represented in the Where-part of the description. The address change needs to be declared. Additionally, we have a triple declaring, that the requester of the address change needs to be a citizen (inwoner). The reason for that is that all the data we want to add about a person in our workflows needs to be related to the same instance, we thus need the unique uri of the citizen. In the To-part of the listing, we see the produced state. The address change is confirmed by the police.
                        {ex:movemap gps:description
                            (
                            {}                                      #From
                            {}                                      #Between

                            {?x ex:confirmationOfAddressChange true}        #To
                            step:confirmAddressChange                       #Step name
                            20160                                 #Duration
                            0                                        #Monetary cost
                            0.98                                   #Success
                            0.97                                   #User satisfaction
                            )
                        }
                        <=
                        {
                            ?x a o-persoon:Inwoner.
                            ?x ex:addressChangeDeclared true
                        }.                                          #Where
OSLO-STEPS as descriptive logic rules
As described above, we have an internal format we base our workflow composition on - this format is based on N3 - and we have the OSLO-STEPS vocabulary which is designed to be very close to existing OSLO vocabularies such that users who already know these standards do not have problems to write rules. To translate from one representation to the other, we defined rules. Below, we explain how these rules work in more detail.
As explained above, with OSLO-STEPS we state for each stepe the required and the produced state and for these states we have shapes. For our implementation, we need to find these shape for each step and translate from SHACL to our pattern representation. We wrote different rules for different SHACL constructs. We exemplify that on shapes declaring that a value needs to exist. This is normally indicated by the predicate sh:mincount (see also listing 3). If for a path (sh:path) a sh:mincount value of 1 is given, that means that the target for which the shape is defined always needs to have at least one value connected to it via the predicate which appears after sh:path. The shape in Listing 3 for example states that for every citizen (o-persoon:Inwoner) x there needs to be a value for ex:addressChangeDeclared. This shape is even more explicit, the value needs to be true, this is indicated by the predicate sh:hasValue. We expect a triple of the form:
x ex:addressChangeDeclared true
In order to produce the above pattern based on the shape displayed in Listing 3, we employ a rule which detects the occurrences of such shape descriptions and produces the above mentioned pattern. We display the rule for that particular pattern in Listing 8. Next to the assignment of a concrete value for a predicate, our implementation also supports nested paths (i.e. if we have two predicates connecting the target with a node) and qualified value shapes. We plan to further expand our pattern creation mechanism.
                        {
                            ?stateShape a o-steps:StateShape;
                                sh:property ?property;
                                sh:targetClass o-persoon:Inwoner .
                            ?property sh:path ?path;
                                             sh:value ?value;
                                             sh:minCount 1.
                            }
                            =>
                            {
                            ?stateShape :pattern {var:x ?path ?value} .
                            }.
In the description in Listing 7 for which the address change is declared is the same instance for which the address change is confirmed. We thus need to internally represent the target of the shape as a constant which later on will need to be replaced by a variable.
After assigning the expected pattern to each shape, our translation finds for each step description all states which are connected with the required state and all shapes which are connected with the produced shapes. It additionally takes all the declared costs into account. The produced shapes get translated to the To-part of the internal step representation format. The required shapes get translated to the Where-part of the step description since in our use cases there are no actions which make data invalid (this might changes if we get more complex use cases). To the Where-part of the internal representation format, we additionally add a triple declaring the target(s) for the shapes used - in our case all shapes are declared for instances of the class o-persoon:Inwoner - and where necessary, we add functions creating new uris for each variable which is used in the To-part of the step description but not in the where-part. This has technical reasons, as backward rules cannot have new variables in their consequence, we need to use this mechanism.
Our translation rules get executed by the EYE reasoner with which we can also produce variables for all instances in our var-namespace. From the different descriptions in Listings 1-4 with additional descriptions of the produced state, we for example produce the rule displayed in Listing 8.
Goals
Next to the description of the different possible steps in our internal format and the description of the current situation as exemplified in Listing 5, we need one more information in order to start our workflow composition process, we need to declare the goal we want to achieve by the execution of the workflow.
We display an example of such a goal declaration in Listing 9. Each goal description contains the state we want to reach by executing the workflow (here, the address change needs to be confirmed) together with the limits for each weight. Here, we do to spend more than 4 weeks with the process, we do not want to pay more than 20 Euros, we want to have a success rate of the entire workflow of at least 80% and the user satisfaction value should not go below 0.8.
                        {
                            ?SCOPE gps:findpath
                                (
                                    {?x ex:confirmationOfAddressChange true.}
                                    ?PATH
                                    ?DURATION
                                    ?MONETARYCOST
                                    ?SUCCESS
                                    ?SATISFACTION
                                    (
                                    40320 #Limit for duration (4 weeks)
                                    20 # Limit for monetary costs
                                    0.8 # Limit for success rate
                                    0.8 # limit for user satisfaction
                                    )
                                ).
                            } => {
                                    ?x gps:path (?PATH
                                                        ?DURATION
                                                        ?MONETARYCOST
                                                        ?SUCCESS
                                                        ?SATISFACTION).
                            }.
We declare such limits for each workflow because of technical reasons. Since our workflow composition produces every possible workflow which reaches the goal and there can be many of such workflows, we limit the search space by declaring such limits. This does not only make it easier to produce the workflow, it also makes it easier for the other tolls depending on the workflow composition to choose from the workflows provided.
Workflow composition
Our workflow composer now takes the description of the initial situation (as exemplified in Listing 5), the different step descriptions using our internal format (Listing 7) and the goal to achieve (as in Listing 9) into account. The workflow can additionally make use of external rules which need to be stated in a backwards manner.
Starting form the current situation, the composer produces all possible paths towards the goal which are within the stated limits. For each path the composer generates, the actual costs are calculated. For monetary costs and duration, the sum of all the steps included is taken, for success and comfort we take the product of all costs.
In Listing 10, we provide an example output of such a composition process. In order to have an address change confirmed, the user needs to provide personal information, information about the movement and the new address and he needs to request an address change which then needs to be confirmed by the police.
In our example, we do not have alternative paths. This is because we wanted to keep the example for this document simple and understandable. Therefore, all paths are just permutations of each other. The last step, the confirmation of the address change always comes after the declaration, that is because these steps depend on each other.
Next to each path, we also display the different costs. Based on the preferences of the user, different paths can be chosen based on the numbers. Depending on the information available, it can also be that some workflows are shorter for particular users. If we actually compose a workflow taking the information in Listing 4 into account, we can for example expect, the composed workflow does not contain a step asking for personal information since in that case this information is already available in the database.
                        :bob gps:path (
                                        (step:providePersonalInformation
                                        step:provideMovingData
                                        step:requestAddressChange
                                        step:confirmAddressChange
                                        )
                                        30160
                                        4.0
                                        0.88
                                        0.88
                                    ).
                        :bob gps:path (
                                        (step:provideMovingData
                                        step:providePersonalInformation
                                        step:requestAddressChange
                                        step:confirmAddressChange
                                        )
                                        30160
                                        4.0
                                        0.88
                                        0.88
                                    ).
Conclusion
We explained how the OSLO-STEPS standard is used to describe steps and their workflows. By decoupling step descriptions from state and shape descriptions we make sure, that the latter can be reused for different descriptions.
We furthermore showed, how OSLO-STEPS can be translated into our internal standard. By using linked data and semantic web reasoning, we also kept our implementation open for different standards which can be equally used and easily translated if they include the same kind of information.
As a last step, we briefly explained how the workflow composition itself is done. Here, we use backward reasoning in Notation3 Logic and the EYE reasoner. What could still be added to our formalisation is a format to state goals and workflow alternatives in a way which is compatible to OSLO-STEPS, we plan to do so in the future.